How to Convert Raster to Vector on CAD
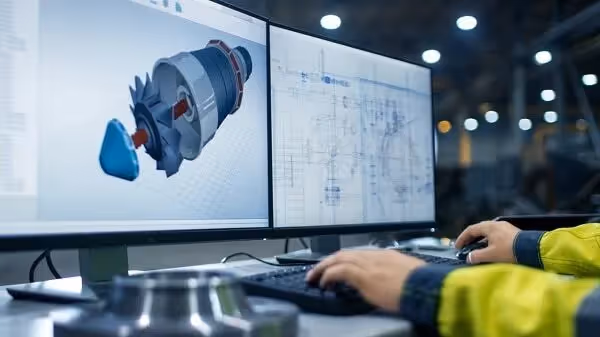
Going from a raster image to a functional CAD model requires a conversion. It’s easy in theory, but it can take a ton of time to do it correctly — it becomes even more difficult if you have a lot of files to convert.
Regardless, our expert engineers put together this guide. We’re going to teach you exactly how to convert raster images to vector 2D CAD files. We’ll even include helpful tips at the end.
Process of Converting Raster to Vector on CAD
The process of converting a raster image to vector CAD file isn’t too involved, but it can be very difficult. Doing it can be a test of patience and skill. Doing it well is even harder. Here are the 5 steps to convert raster to vector on CAD.
Step 1: Is Vector Conversion Right for This Image?
Before getting too far, let’s find out if a raster to vector conversion is the right option for you.
If your engineering drawing is a machined part or assembly, this probably isn’t the right option. For creating 2D or 3D engineering drawings on CAD, you need to draw it in a 1:1 scale. By simply drawing over the raster, you will likely lose the scale.
Instead, use the raster image as a guide — keep it on your desk or on your other monitor while you draw the new part. Use the dimensions and features on the physical drawing to draw the digital version on your CAD program. There’s no need to follow steps 2-5 in this case. If you’re just tracing over a floor plan, site layout, map, logo, or design, then a vector conversion is right for you.
Step 2: Create the Raster
It all starts with making a raster image. To do this, the easiest option is to use a large-format plotter and scan your 2D drawing. If you don’t have a large enough plotter or scanner, then you can’t continue. Skip to the end of this guide to figure out the best option for you.
If you can create the raster image, do it now. Email a copy of the image to your work computer. It’s important that you don’t just take a picture of the image with your phone.
While this might work in theory, it’s a lot more difficult to do the full conversion. If the photo isn’t perfectly level and square, then you could draw a distorted final image through the conversion.
Step 3: Import it to CAD
With the scanned raster image, you can start doing CAD work. Open the email you received from the large-format plotter in step 2. You can use the file if it’s a PNG, PDF, JPEG, or most image-based formats.
Open your CAD program of choice and start a 2D sketch. Since most scanned raster images are top views, it’s best to start with a sketch on the XY plane. Now, import the scanned raster image into CAD. It will show up as a 2D image within this plane that you’re about to sketch.
Make sure the scanned image is legible and correctly oriented. You don’t have to scale the image or change its size at all, instead you can change your screen scale and zoom into the image.
Step 4: Draw Over the Image
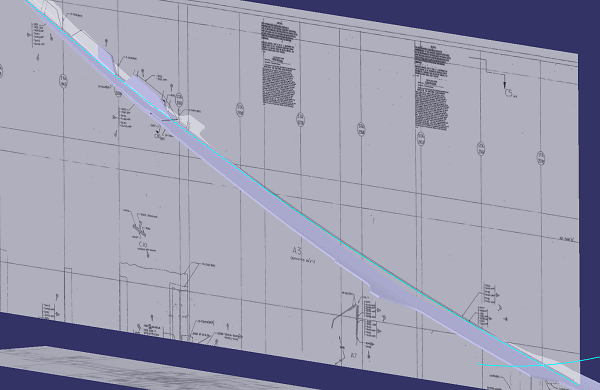
Step 4 is the meat and potatoes of the conversion process: drawing over the image. In our experience, the best way to convert a raster image to a CAD model is by drawing over the image in your CAD program. It’s a manual process (though it’s done digitally), but it gives the best results.
There is no software that’s legitimate, safe, and viable to use instead of this manual process. If your scanned raster image was a bird’s-eye view of your company’s site, then you’ll be tracing around the outline of each building.
How do you do that? In your CAD 2D sketch, you’ll basically be choosing between a few functions:
- Line
- Polyline
- Rectangle
- Circle
- Arc
- Trim
- Extend
With this handful of starter functions, you can do most of the conversion. Whenever you see an “object line” on the raster image, draw over it with a line in CAD. If you’re tracing over a circular silo, then you can use the circle command. From there, it’s a matter of practice before you get good at it.
Step 5: Hide the Raster and Check Your Work
With all of the lines completed and closed, you can either delete or hide your raster image. If you delete it, you’ll need to undo the delete before saving. To hide the raster, you can move it to a separate layer and then hide that layer from your view.
In this step, you want to hide and unhide the raster image and ensure you have a drawn CAD line across the entirety of the image. Check for gaps, missing lines, or features you forgot to trace over. If everything looks good, you’re finished. If you notice missing lines or misplaced features, repeat step 4 until it’s perfect.
Tips for Better Raster to Vector Conversion
To get the best results, our experts put together some tips for raster to vector conversion. Consider these in your next conversion project.
Turn Off Most Snap Settings
One tip is to turn off most of your preset snaps on CAD. As you know, there are default settings that will snap your mouse to automatically find parallel angles, midpoints, and tangential lines of drawn lines.
You should turn off all of these except for endpoint snap. The other snaps can cause you to incorrectly trace the raster image or accidentally lose your place in the drawing.
Use a Bright Layer Line
Our favorite thing to do is use a red, magenta, or cyan layer line whenever we do a conversion. We change it to a standard object layer color in the end, but during the conversion process it’s invaluable.
Why go for a bright color? It helps you spot the difference between the raster image and CAD file. If your vectors are black and your raster shows black lines as well, it could be tough to differentiate between the two.
As a result, you could spend more time trying to complete the model. With bright colors, the contrast is very obvious and speeds everything up.
Zoom Into Your Raster Image
The best practice is to really zoom into the image in your CAD model. By getting closer to the raster image, you can make sure every drawn vector line follows the raster lines perfectly.
In fact, you can draw a circle with a series of straight lines if you’re zoomed in enough. Zooming in helps create a more accurate final product. You’ll notice that the raster image will be blurry and pixelated as you zoom it. This is not a problem. Aim for the midpoint of each blurry line and use your best judgment to get great results.
Let Professionals Handle it
For a lot of people, raster to vector conversion isn’t in their wheelhouse, and there’s nothing wrong with that. There’s a reason why we go to the dentist for dental work — it’s best to trust the professionals.
When it comes to perfect raster to vector CAD conversion, it’s hard to beat a professional team of draftsmen and engineers. A lot of companies decide to outsource this conversion work for a few reasons.
For one, the professionals on the outsourced team will handle the project and deliver the best results with no learning curve. In addition, it saves you a lot of time and money throughout the process.
Conclusion
If you want to speed up the conversion process between raster images and vector CAD files, consider outsourcing. You’ll save time and money, and get rid of some massive headaches.
For some of the best results in the industry, you should choose CAD/CAM Services. Our full-service team of expert and highly-trained engineers will handle all of your raster to vector conversions. We’ll do it manually in CAD, so you’ll get the perfect results. Reach out for a free quote today.
Recent Posts


6 Easy Steps to Convert a 2D to 3D Model Using SolidWorks
Take a Look at Our Case Studies! Solidworks as a platform offers two main 2D to 3D pathways; drawing from scratch and remodeling existing ‘.DWG’ and ‘.DXF’ files as 3D models. The functionality of importing an existing 2D drawing and upgrading it into a...

Tips for Picking the Perfect 3D CAD Viewer for Your Needs
This guide will teach you about 3D CAD viewers and outline considerations to make before picking the right one. We review 5 options and pick a clear winner.
In this guide, you’ll learn how CAD/CAM Services can save you time and money during each digitization project. Digitization can make manufacturing faster than ever before.