Creating Assembly Models in 3D CAD
Overview
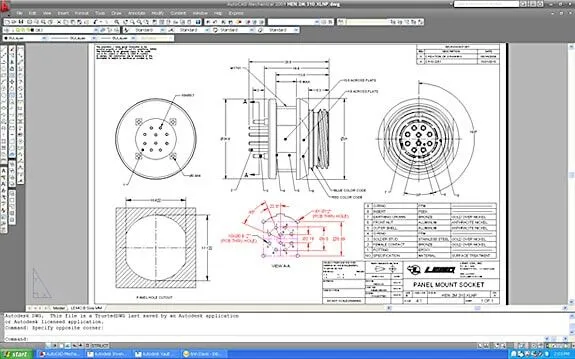
Traditional 2D drafting is capable of showing the geometry of simple 3D parts, however solid models extend that ability by being able to merge complex assemblies of parts into a complete mechanism. Using a 3D so
ftware program, such as CATIA, various 3D parts can be combined into complete assembly models by rotating the parts, sliding them, exploring various ways to join them and employing other design concepts that are far beyond the geometric representations of the 2D CAD. Learning how to carry out complex operations within a 3D program in order to create a “working” assembly model can take time. In fact, entire college courses can be devoted to various projects that are designed to develop 3D design skills and knowledge.
What is Assembly Modeling?
Assembly modeling is a technology and process of using CAD (computer-aided design) and product visualization software to design components of a product. Each component within an assembly is represented as surface models.
Assembly modeling in CAD refers to both the technology and the techniques used by 3D CAD through which the design intent of a part or assembly is accurately and unambiguously described by a 3D virtual model.
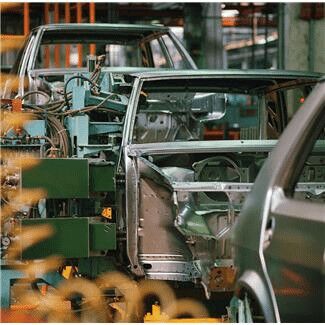
These types of sophisticated software systems are designed to handle multiple files that represent the individual components that make up an entire product or machine. Each of these components with the complete assembly is represented as solid models.
Often, several different design engineers may be working concurrently on a machine or product that has multiple assembly parts. The head designer generally has access to all of the assembly models and is responsible for merging them together into the final machine design. New parts are added as they are created, with each design engineer having access to the assembly model while it is a work in progress. This free access during the design phase ensures that while working on their own parts, each designer can check to make sure that his/her part works within the overall design and functionality. At this stage, it is critical that the design evolution be visible to all of the design engineers that are involved in the project.
The various individual data files describe the 3D geometry of individual components and are assembled r through a number of sub-assembly level s before creating an assembly that describes the whole product. This is called bottom-up design and is supported by nearly all CAD 3D systems. Some systems, via associative copying of geometry between components, also allow a top-down method of design. The Solidworks ™ knowledge base defines the two as follows:
- Bottom-up Design
Bottom-up design is the traditional method. You first design and model parts, then insert them into an assembly and position the parts. To change the parts, you must edit them individually. These changes are then seen in the assembly. Bottom-up design is the preferre
d technique for previously constructed, off-the-shelf parts, or standard components like hardware, pulleys, motors, etc. These parts do not change their shape and size based on your design unless you choose a different component.
- Top-down Design
In Top-down design, parts’ shapes, sizes, and locations can be designed within the assembly. For example, you can model a bracket so that it is always the correct size to hold another part, even if you move the other part. You can also use the top-down design on certain features (such as locating pins) of otherwise bottom-up parts. The advantage of the top-down design is that much less rework is needed when design changes occur. The parts know how to update themselves based on the way you created them.
You can use top-down design techniques on certain features of a part, complete parts, or entire assemblies. In practice, designers typically use top-down techniques to lay out their assemblies and to capture key aspects of custom parts specific to their assemblies.
Assembly Modeling and PLM
Assembly modeling has been an important aspect of achieving the full benefits of Product Lifecycle Management (PLM) has led to ongoing advances in this technology, including lightweight data structures that allow visualization of and interaction with large amounts of product data. PLM is the process of managing the entire lifecycle of a product from its conception, through design and manufacture, to service and disposal. It integrates people, data, processes, and business systems to provide a product information structure and system for companies.
As PLM systems help organizations to cope with the increasing complexity and engineering challenges of developing competitive new products for the global marketing, 3D assembly modeling helps to visualize how those products will function and change over the course of their lifecycles.
Recent Posts


CAD Outsourcing Doesn’t Have to Be Done In India
CAD Outsourcing Doesn’t Have to Be Done in India Do a Google search for “CAD Outsourcing” and what you’ll find is lots of firms located in India, which is fine if you’re prepared to go off-shore for CAD services. But what if your U.S. based company prefers to stay a...
AutoCAD Fiber Optic Designs & Drawings
Before proceeding forward in explaining the affinity between AutoCAD and Fiber Optic, it would be prudent to rationalize the utility of optical cables. When communicating between systems, either via the internet or via an internal network system, a medium needs to be...

CAD Outsourcing: How to Get the Most Out of Engineering
In today’s competitive market, companies need as much help as possible. If you want to take a larger market share, you can start by outsourcing some of your work. This is a quick way to expand your engineering power without onboarding and training a new staff. This...